

Corn Lily - Ixia hybrids
 Ixia - Image by Beverly Buckley from PixabayCondensed Version:
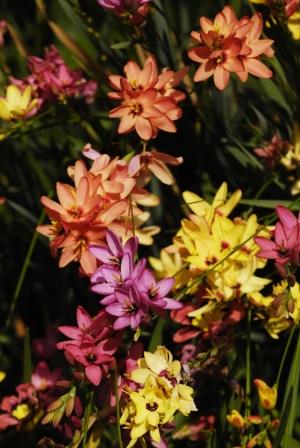
Ixias are planted from mid-April through May and June, to flower in September and October. Their brilliant star-shaped blossoms come in vibrant colours ranging from purple, mauve, blue, red, orange, pink, yellow, cream and white, and even an unusual turquoise or green.
Ixias grow best in the winter rainfall regions and at the coast, but they also grow well inland if they can be watered regularly. They have quite a high frost tolerance, tolerating temperatures as low as -2°C. In subtropical regions they are planted out only in the coolest months, and treated more like annuals which are discarded after flowering.
The plants will flourish in full sun to semi-shade, and although Ixias love plenty of water, they also require soils with perfect drainage. Plant the corms at a depth of 2cm with 5cm spacing between them.
In the summer rainfall regions you will need to water the plant regularly and deeply throughout winter and spring. Feeding is not usually necessary, but an occasional feeding with bulb food will not harm the plants, and is recommended for potted plants.
After flowering, let your Ixia plants die down completely, before you remove them. You can leave the corms in the ground for next season, as long as they are in well-draining soil and in a part of the garden that will not receive much watering in summer. If not, allow the plants to die down naturally before lifting and storing them in late December or early January.
 Ixia 'Mix' Picture courtesy HadecoFull Version:
Description, History & Interesting Facts:
The vibrantly coloured Ixia hybrids we love and grow in our gardens today have all been bred from about 50 species from the winter rainfall regions of South Africa. Ixia are a genus of cormous plants of the Iridaceae, or Iris family, which, although it has an almost worldwide distribution, just over half of them occur in southern Africa, where 38 genera are known. In the Cape Floral Region alone, 707 species and 27 genera are recorded.
Ixias are often called "Wand-flower", "African Corn Lilies", and in Afrikaans “Kalossie”, and are quite enchanting in the flower garden with their long sword-like leaves and wiry flowering stems up to 60cm tall. Ixias are widely planted and admired by gardeners all over the world, and in South Africa they are planted from mid-April through May and June, to flower in September and October. Their brilliant star-shaped blossoms come in vibrant colours ranging from purple, mauve, blue, red, orange, pink, yellow, cream and white, and even an unusual turquoise or green. The flowers have darker centres, and often dramatically contrasting spots and blotches.
In the Garden:
A mixture of corn flowers give a sort of wild meadow look when planted in large groups, and will certainly brighten up your borders. They will also attract attention if planted in patio pots, and make stunning cut flowers. Cutting flowers in the early mornings will generally prolong their vase life. When cutting, ensure there’s at least 10cm of stem left on the plant.
Cultivation/Propagation:
Ixias naturally grow best in the winter rainfall regions of the country and at the coast, but they also grow well inland if they can be watered regularly. They have quite a high frost tolerance, tolerating temperatures as low as -2°C. In subtropical regions they are planted out only in the coolest months, and treated more like annuals which are discarded after flowering.
The plants will flourish in full sun to semi-shade, and although Ixias love plenty of water, they also require soils with perfect drainage. When planting the corms, loosen the soil to a depth of 30cm, and if drainage is not perfect, work in some washed river sand (available at garden centres). Plant the corms at a depth of 2cm with 5cm spacing between them.
In the summer rainfall regions you should mulch after planting and you will need to water the plant regularly and deeply throughout winter and spring. Feeding is not usually necessary, but an occasional feeding with bulb food will not harm the plants, and is recommended for potted plants.
After flowering, let your Ixia plants die down completely, as this is important for the growth of the corm, so allow the leaves go completely brown and dry before you remove them. If you live in the winter rainfall regions, you can leave the corms in the ground for next season, as long as they are in well-draining soil and in a part of the garden that will not receive much watering in summer. If not, you can allow the plants to die down naturally before lifting and storing them in late December or early January. In the summer rainfall regions it is often best to lift the bulbs.
When lifting, ensure that you lift every corm, even the smallest cormlets that developed during the winter season. Make sure that the corms and cormlets are completely dry and are stored at room temperature inside a paper bag or cardboard box until next season.
Ixias are propagated via cormlets which will flower in the following season, as well as from seeds which will flower after two years.
Problems, Pests & Diseases:
Ixias suffer from few pests or diseases if they are grown in well drained soils. Aphids and mealybugs may occasionally attack the plants, especially those grown under a roof on patios etc.
Warning:
We did not find Ixia hybrids listed specifically, however, common corm plants including: crocosmia (Crocosmia sp.), gladiolus (Gladiolus sp.), freesia (Freesia sp.) and crocus (Crocus sp.) are considered toxic. With ingestion of the above-ground parts of these plants, mild gastrointestinal upset can be seen. The corms are more irritating than the above-ground parts and can cause bloody vomiting and diarrhoea.
Freesia - Freesia x kewensis

![]() Condensed Version:
Condensed Version:
Freesias are beautiful additions to any garden, whether you cluster them in beds or create a colourful display in containers. Hundreds of hybrids and varieties are available in mixed or single colours ranging from dark purple to lilac, red, orange, yellow, pink, white, and various bi-colours. Freesias, with their grassy, sword-shaped leaves may only grow 20 to 30cm tall, but what they lack in stature they sure make up for in flower power and fragrance.
In South Africa, freesias are best planted from mid-April to May for a stunning display of blooms from August to September. Freesias are only hardy to moderate frost and severe frost will damage their leaves, so if you live in extremely cold regions, plant them into pots which can be placed on a protected patio or entranceway. Find a place in your garden which receives sun to light shade, in warmer winter regions the plants will need some protection from the hot midday and afternoon sun.
Freesias will adapt to most well-drained garden soils, but thrive on light yet fertile, slightly acid soils. Prepare the beds well before planting, adding some additional compost or acid compost if your soil is alkaline. The bulbs (corms) look like small, slim onions and need to be planted with the pointed end facing up. Space them about 7cm apart and plant them 5cm deep. Blooming should begin about 10 to 12 weeks after planting the corms. Freesias must be watered regularly but do not like to be waterlogged – allow the soil to almost totally dry out between each watering. If planted in good soil freesias will not require additional feeding, but an occasional feeding with a specialised bulb feeder won’t do any harm.
 Freesias are loveley cutflowersFull Version:
Description, History & Interesting Facts:
These little beauties are sure to capture your heart and are grown worldwide for their cheerful colours and fabulously fragrant flowers which last long in a vase and will perfume an entire room, bringing spring right into your home. Freesias remain one of the most sought after cut flowers commercially, and the plants are also cultivated for their perfume. Today, the essential oil is widely used in soaps, scented candles, potpourri and body oils.
It was probably this alluring scent that brought freesias to the attention of Christian P Ecklon when he discovered this little flower in South Africa. In fact, he was so taken by this little perennial that he named it in honour of Dr Friedrich Freese, a German physician and botanist from Kiel, and a pupil and friend of Ecklon’s. Consequently, freesias are said to symbolise sweetness, friendship and trust.
Freesia belongs in the large and very diverse Iris (Iridaceae) family with species distributed all over the world. The greatest concentration of freesia species grow naturally across southern Africa, as do many other well-known ornamentals like: Gladiolus, Sparaxis, Tritonia, Moraea, Watsonia, Ixia, Crocosmia, Babiana, Dierama and of course, Freesia.
In the southern winter rainfall areas of South Africa we have about 16 species of freesia which are endemic to this region, meaning that they grow wild only here and nowhere else in the world. In these regions they dry out and become totally dormant during the long, dry and hot summer months, but once they are nurtured by the cooler weather and ample rains of autumn and winter, they start shooting again in autumn, grow vigorously through autumn and explode into bloom in spring.
Freesia has a rather complicated and confusing history with lots of wrong names, misapplication of names and synonymy over the years, and the first two species that were cultivated in Europe in 1766 were both placed in different genera, and it was only in 1866 that Freesia was described as a distinct genus. These early collections of were grown only by collectors, and it was only when yellow-flowered plants of F. leichtlinii were discovered in 1874 by Max Leichtlin, in the Orto Botanic Gardens at Padua, that freesia entered the world of horticulture. The Orto Botanico di Padova is a botanical garden in Padua, in the north-eastern part of Italy. Founded in 1545 by the Venetian Republic, it is the world's oldest academic botanical garden that is still in its original location. How the plants got there is a mystery and nobody could remember who had planted them there, so the type was named Freesia leichtlinii after Max who spotted them.
Max started propagating Freesia leichtlinii and distributed the material widely. These flowers, although labelled yellow, actually appear cream with yellow markings, and their backs were flushed with maroon. Victorian gardeners welcomed this newcomer with enthusiasm, but it was not until Freesia alba first appeared in the English nursery trade in 1878 that freesias quickly spread to Europe and North America. This freesia caused quite a sensation, appearing in almost every horticultural publication of note in both Europe and America in the years following its introduction.
Breeding began immediately after F. alba appeared on the market and continues to this day, resulting in hundreds of hybrids and varieties, available in mixed or single colours ranging from dark purple to lilac, red, orange, yellow, pink, white, and various bi-colours. Freesias, with their grassy, sword-shaped leaves may only grow 20 to 30cm tall, but what they lack in stature they sure make up for in flower power and fragrance, so treat yourself to a packet or two of freesia corms this autumn.
In the Garden & Home:
Freesias are beautiful additions to any garden, whether you cluster them in beds or create a colourful display in containers. Also, by planting the bulbs at weekly intervals you can extend the blooming season. They can also make gorgeous houseplants and are very long-lasting cut flowers, so when they are in bloom, feel free to cut the flowers for striking bouquets and sweet fragrance - the more you pick them, the more they will bloom.
![]() Cultivation/Propagation:
Cultivation/Propagation:
In South Africa, freesias are best planted from mid-April to May for a stunning display of blooms from August to September. Freesias are only hardy to moderate frost and severe frost will damage their leaves, so if you live in extremely cold regions, plant them into pots which can be placed on a protected patio or entranceway. Find a place in your garden which receives sun to light shade, in warmer winter regions the plants will need some protection from the hot midday and afternoon sun.
Freesias will adapt to most well-drained garden soils, but thrive on light yet fertile, slightly acid soils. Prepare the beds well before planting, adding some additional compost or acid compost if your soil is alkaline. The bulbs (corms) look like small, slim onions and need to be planted with the pointed end facing up. Space them about 7cm apart and plant them 5cm deep. Blooming should begin about 10 to 12 weeks after planting the corms.
Freesias must be watered regularly but do not like to be waterlogged – allow the soil to almost totally dry out between each watering. If planted in good soil freesias will not require additional feeding, but an occasional feeding with a specialised bulb feeder won’t do any harm.
Growing freesias in containers is easy if you have a good quality, well-drained soil. Almost any commercially available potting medium will work fine. Make sure there are adequate drainage holes, and plant the bulbs closer together than you would in the ground. Check the soil for moisture often because plants in pots dry out quicker than those growing in the ground. Feeding with a specialised bulb feeder may be required if you are growing in pots.
If you wish to keep the corms for next seasons planting, don't cut the leaves off the plants after they have finished blooming, as the leaves will continue gathering sunlight to create food through photosynthesis and strengthen the bulb for the future. Continue watering, and later, as the plant slips into dormancy and the leaves start to turn yellow and die, the foliage many be removed and the bulbs lifted for next season. If the soil drains well, the bulbs can also be left in the ground.
![]() Problems, Pests & Diseases:
Problems, Pests & Diseases:
As the weather warms up in spring, watch out for thrips and aphids and spray if required. Slugs and snails can also damage the leaves.
Warning:
No part of freesia is toxic to humans. However, even if it isn’t toxic, ingesting large amounts of any non-food plant can cause stomach upset or discomfort, so keep an eye on small children in the garden. Freesia is also safe for dogs and cats. However, if pets ever exhibit any symptoms of poisoning, including vomiting, severe diarrhoea, uncontrollable drooling or lethargy, you should call a vet right away.
Daffodil, Narcissus, Jonquil - Narcissus
 Condensed Version:
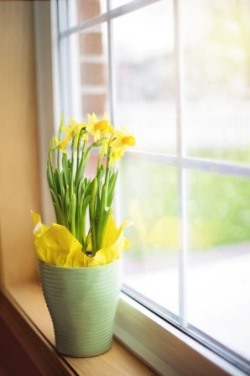
Breeders have developed thousands of Daffodil varieties; some with double, triple, or multiple rows and layers of segments, and in colours ranging from yellow to cream, orange, pink and white. The enjoyment of these beauties can be extended by the planting of different varieties, with later-blooming cultivars succeeding earlier ones.
Daffodils are extremely hardy to frost, grow well throughout most of the cooler regions of the country, and are usually planted towards the end of April. They will adapt to most well-drained garden soils but it is advisable to dig the beds over to a depth of at least 20cm, adding lots of compost and a dressing of bone meal.
Daffodils do best in dappled shade or full morning sun, and it is vital that you water regularly from the time they are planted until they have completely died down in early summer; keeping the soil constantly moist but not soggy. Plant the bulbs with about 5cm of soil above the neck of the bulb and about 10cm apart; in pots, pack them close together, almost touching, with just the barest covering of soil. Be patient, daffodils can take several weeks before showing themselves above the ground.
 Full Version:
Description, History & Interesting Facts:
Various common names including daffodil, narcissus, and jonquil are used to describe all or some of the genus Narcissus. The Greek word “narcissus” means numbness; a reference to the toxic substance in its bulb, which is of a narcotic nature. Depending on which botanist you talk to, there is between 40 and 200 different daffodil species, subspecies or varieties of species, and over 25,000 registered cultivars divided among the thirteen divisions of the official classification system.
Narcissus is native to meadows and woods, with centres of distribution in the Western Mediterranean, southern Europe, North Africa and West Asia. Breeders have developed thousands of varieties; some with double, triple, or multiple rows and layers of segments; and in colours ranging from yellow to cream, and orange to pink and white. The enjoyment of these beauties can be extended by the planting of different varieties, with later-blooming cultivars succeeding earlier ones.
In the Garden:
 In the Garden & Home:
What would spring be like without the sunny blooms of daffodils to remind us that winter is finally over and “spring has sprung”; and there is something truly magical about a deciduous woodland floor covered with daffodils in full bloom. The bulbs begin to grow when most of the leaves have fallen from the trees, allowing the autumn and winter sunlight through; and have finished blooming by the time the tree is in full leaf again. In nature, daffodils thrive in the open sunny glades between the trees, just outside the drip line.
You can create this same effect in your garden, underneath a single deciduous tree, or large woodlands of deciduous trees, by planting drifts of daffodils and over sowing with an evergreen shade lawn. Do not cut the grass but let it grow together with the daffodils to create a wild look.
Daffodils mix well with small groundcovers and annuals for borders in semi-shade, as well as with shade loving bulbs like: Spring Starflower (Ipheion), Grape Hyacinth (Muscari), Snowflakes (Leucojum), Freesia and Garden Hyacinths. They also grow beautifully in pots, and are often sold as indoor pot plants - ideal for a windowsill which receives morning sun. Spoil yourself with some daffodils this spring, and even if you have the smallest of apartments, you are sure to have space for a bunch – Daffodils make excellent and long lasting cut flowers.
Cultivation/Propagation:
Daffodils are extremely hardy to frost to and flourish in even the coldest climates. In South Africa they grow well throughout most of the cooler regions, as long as they are only planted out once the heat of summer has left the soil - usually towards the end of April. They will adapt to most well-drained garden soils but it is advisable to dig the beds over to a depth of at least 20cm, adding lots of compost and a dressing of bone meal.
 Daffodils do best in dappled shade or full morning sun - in a position shielded from the brightest midday sun. It is vital that you water regularly from the time they are planted until they have completely died down in early summer; keeping the soil constantly moist but not soggy; mulching the soil will help to keep their roots cool and conserve moisture.
In the garden, plant the bulbs with about 5cm of soil above the neck of the bulb and about 10cm apart. In pots, pack them close together, almost touching, with just the barest covering of soil over the bulbs. Be patient, daffodils can take several weeks before showing themselves above the ground.
Cut out the dead flowers regularly and once the plant has finished blooming continue to water and feed the green leaves regularly, as this is when the nutrition they provide will feed the bulbs and produce a good flowering bulb for next season - only cut off the leaves once they are totally withered.
While some kinds of bulbs tend to dwindle and die out if left in the soil, daffodils should increase, and you can leave the bulbs in the soil for many years, provided the soil drains well. After four to five years well-fed bulbs will have formed many baby offsets and they will become overcrowded. You may lift them when their foliage starts to yellow, in early summer. Divide the offsets from the mother bulbs by prising them apart, and replanting immediately.
Many gardeners prefer to lift their bulbs in early summer, storing them in a dry place, at ordinary room temperatures, until next autumn. If you have planted them in pots, the pots can be moved to a cool spot in summer, where they will not be overwatered, or you could bury the pots in the garden during summer, with just the rims showing.
 Problems, Pests & Diseases:
Daffodils have few pest problems, but watch out for aphids, slugs and snails in spring.
Warning:
All parts of the daffodil are toxic. When swallowed, it can cause nausea, vomiting, diarrhoea, and abdominal pain. Eating the bulb can cause severe irritation of the mouth and stomach upset. These symptoms are usually not life threatening and resolve within a few hours.
Harlequin Flower - Sparaxis
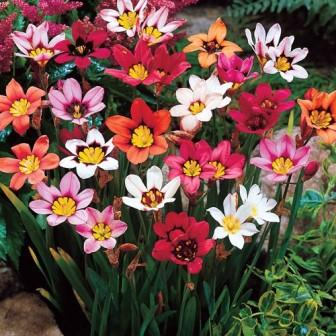 Sparaxis Mix. Picture Courtesy https://www.hadeco.co.zaCondensed Version:
Sparaxis have earned their popularity because of their ease of growth and the riot of colour they bring to mixed flower beds in spring, and these little cut flowers come in shades of pink to salmon and red, orange, and white. Corms are available from March through mid-June, depending on the where you live, and generally they are planted out in May or June, to flower anytime from August to October.
Sparaxis elegans will not tolerate temperatures that drop below 0°C for extended periods, and the plants prefer full sun, but will take some shade. Although they do well in a range of different soil types, including poor soils, they thrive in well-drained loam or nutrient-rich clay soils. Prepare the planting beds by digging them over well, and incorporating some compost or other organic matter. Store the corms in a cool, dark place until planting time, when the weather and the soil have cooled down considerably.
Plant the corms 7 to 10cm apart and 5cm deep and water well, keeping the soil moist but not soggy until shoots appear. In pots the corms are planted closer together. Continue to water regularly throughout winter, and when the plants are in bloom, but after flowering the soil must be left to dry out completely in order for the corms to ripen.
If you are growing Sparaxis in containers, they can be moved away from excessive rainfall or watering in summer. To ensure perfect drainage, plant in a fertile potting soil that is light and a bit sandy, and ensure that you feed regularly during the growing season for the best results.
Feeding with a speciality bulb food like Hadeco Bulb Food, or any other liquid plant food for flowers, will give your bulbs all the nutrients they need.
Full Version:
Description, History & Interesting Facts:
Sparaxis is a genus of flowering plants in the Iris family (Iridaceae), called the” harlequin flowers”, but it also goes by other common names like: “Cape Buttercup”, “Sparaxis”, and “Spogfluweeltjie”. The genus has 16 species, all of which occur only in the winter rainfall regions of the Cape Province, and are therefore called “endemic” to this region.
Sparaxis forms part of the Greater Cape Floristic Region, and Sparaxis elegans is endemic to the Western Cape, occurring from the Bokkeveld Plateau in the north-west, and extending southwards for approximately 25km into the Nieuwoudtville area. The more common salmon-pink form occurs in the northern part of its range in the Nieuwoudtville area, and the white-flowered form occurs to the south, mainly in stands of pure white, but sometimes mixed with the pink form.
The plants are found on nutrient rich, light or heavy clay soils in Renosterveld, a term used for one of the major plant communities and vegetation types of the Cape Floral Kingdom. Essentially, Renosterveld used to support the large animals found here, but these are now extinct, or have been reintroduced. Fynbos is much richer in plant species, but has such poor soils that it cannot support even low densities of big game.
Renosterveld is an evergreen shrub-land which mainly comprises of species in the daisy family with a wealth of grasses, annuals, herbaceous perennials, and an extraordinary array of geophytes like Sparaxis. Geophytes are plants with underground storage organs, where the plants hold energy and water. Commonly called “bulbs”, geophytes are far more diverse than that, and include plants with tubers, corms or rhizomes. Sparaxis elegans is a geophytic perennial which holds energy and water in its corms during the hot, dry summer season, sprouting and growing when the rains return in autumn and winter, flowering in spring and going completely dormant once again in summer.
This little bulb was introduced to Europe in the 1780’s and is still loved and cultivated there for its vibrant little cut flowers. Sparaxis elegans was given this Latin name, because of the elegance of its little open-faced flowers, and it remains a very popular garden ornamental that is grown worldwide.
At home, although it is still quite common in its natural habitat, it is threatened by habitat degradation and fragmentation, and has been classified as ‘Near Threatened’ on the South African Red List. The nutrient-rich clay soil on which it grows is the most productive agricultural land on the Bokkeveld Plateau, resulting in 77% of its habitat already being lost, and the greatest known threats to the species include overgrazing by livestock, and the loss of its habitat due to agricultural disturbances.
Sparaxis has a rounded corm as its main underground rootstock, measuring 10 to 17mm in diameter, with a fine, fibrous outer coating. The plant produces five to nine lance shaped leaves that emerge in a fan shape, and garden cultivars grow about 30cm tall. It has simple flowering stems that carry a spike of three to five star-shaped flowers which are predominantly salmon-pink or white, although other colour variants can be found in areas of co-occurrence. The flowers have a purple centre, and a distinctive ring of yellow and black markings surrounding the throat of its short funnel-shaped tube. The blooms lack any perceivable scent.
The male reproductive parts (stamens) are very distinct for Sparaxis elegans, and the purple filaments display anthers that are S-shaped and tightly curled around the style, and this is not seen in any other member of the genus. It’s also the only species that produces dark purple to brown pollen, while the pollen of other species is typically yellow to white.
For such a small genus, the pollination systems within Sparaxis are unusually diverse, and it is known that the hopliine beetle (Peritrichia rufotibialis) pollinates Sparaxis elegans, and the tabanid fly, (Philoliche atricornis) also frequents the species, possibly in search of minute traces of nectar. When conditions for cross-pollination are not met, Sparaxis is also able to produce seeds via self-pollination. Because it is both self and cross pollinated, it is referred to as a self-compatible species with a bimodal pollination system.
The species are also inter-fertile, and hybrids between Sparaxis elegans and Sparaxis grandiflora have produced dozens of beautiful garden hybrids over the years, and today we can buy these little cut flowers in colourful mixtures, in shades of pink to salmon and red, orange, and white.
At the end of the flowering period, which ranges from August to September, the plants yield fruits that split soon after drying to release small round, glossy red seeds.
Uses:
Apart from horticultural value, Sparaxis, in general, has not been used for any commercial purpose.
In the Garden:
Sparaxis have earned their popularity because of their ease of growth and the riot of colour they bring to mixed flower beds in spring. To experience the full effect of their radiant colours, plant them in bold groups of 25 or more. They are also very effective planted in the pockets of rock gardens that can be kept dry in summer.
If space is limited, grow them in pots, and don’t forget to cut the long lasting blooms to bring a bit of spring indoors.
 Cultivation/Propagation:
In South Africa, Sparaxis corms are available from March through mid-June, depending on the where you live, and suppliers like Hadeco sell them online, and will also ensure that garden centres receive them when the planting time for that specific region is ideal. Generally they are planted out in May or June, to flower anytime from August to October, depending on the region and planting time.
Sparaxis elegans will not tolerate temperatures that drop below 0°C for extended periods, and the plants prefer full sun, but will take some shade. Although they do well in a range of different soil types, including poor soils, they thrive in well-drained loam or nutrient-rich clay soils. Prepare the planting beds by digging them over well, and incorporating some compost or other organic matter. Store the corms in a cool, dark place until planting time, when the weather and the soil have cooled down considerably.
Plant the corms 7 to 10cm apart and 5cm deep and water well, keeping the soil moist but not soggy until shoots appear. In pots the corms are planted closer together. Continue to water regularly throughout winter, and when the plants are in bloom, but after flowering the soil must be left to dry out completely in order for the corms to ripen. In the winter rainfall regions the corms can stay in the soil for long periods, as long as they are planted in regions of the garden they will not receive much watering along with the rest of the summer garden.
Because the soil should remain relatively dry throughout the summer months, if you are growing Sparaxis in summer rainfall regions, the corms are usually lifted and discarded and new ones purchased each season, but if you wish to keep them they can be lifted and stored.
If you are growing Sparaxis in containers, they can be moved away from excessive rainfall or watering in summer, but in pots overcrowding may occur and lifting and dividing the corms will eventually become necessary. To ensure perfect drainage, plant in a fertile potting soil that is light and a bit sandy, and ensure that you feed regularly during the growing season for the best results.
Feeding with a speciality bulb food like Hadeco Bulb Food, will give your bulbs all the nutrients they need. The solution has been specially formulated by Dutch flower bulb growers, and promotes the development of strong roots for vigorous foliage, as well as nutrients to ensure abundant flowers. It is easily applied by simply sprinkling lightly over the top of the soil and watering it in. Feed immediately after planting and then at monthly intervals throughout the growing season, and for the best results apply during the cool of the day. The composition of Hadeco Bulb Food makes it ideal to use on all blooming plants, including annuals and perennials, so I feel it is well worth purchasing if you love flowers of all kinds. Any other liquid plant food for flowers will also be fine.
Although most gardeners usually thrown the plants and corms away after winter to make space for summer bulbs. If you have space and wish to propagate, it’s easily done in autumn by separating the cormlets from the larger parent corms, or by sowing seeds. Remember that the corms must be kept dry in summer, and some seedlings will flower after one year, but not all will, and you may have to wait two seasons before all the seeds sown, or small corms, reach flowering size.
Seeds or corms are usually sown or planted out into rows in garden beds and allowed to grow throughout the season until the foliage dies down. The little cormlets can then be removed from the soil and sorted by size. Those that are large enough can be re-planted in beds to flower next spring, and the remainder are replanted in rows for another season of growing.
 Problems, Pests & Diseases:
In the wild these plants are hardy and seldom attacked by any pests or diseases, but in the garden watch out for slugs and snails who relish the foliage, and porcupines which are known to eat the corms.
The most likely problems that may occur are those caused by too much water in summer. The corms are subject to fungal rotting if not kept dry when the plants are dormant.
Warning:
I did not find Sparaxis elegans listed as toxic to humans and pets, but always advise parents to supervise small children in the garden and to discourage pets from chewing on plants.
Lachenalia, Cape Cowslip, Cape Hyacinth, Viooltjie – Lachenalia
 Lachenalia hybrid 'Robyn' Picture courtesy www.newplant.co.za
 ![]() Condensed Version:
Condensed Version:
Lachenalia are fabulous little blooms which will definitely draw comment in your garden with their fascinating leaves and bright little bell-shaped flowers on upright stems, and most unusual colourings. They may be short in stature, with their flowers growing on spikes about 25cm high, but what they lack in stature, they more than make up for with their vividly coloured blooms, which include green, glowing shades of red, yellow, chartreuse and purple. Their diversity in foliage includes those with broad green leaves, with purple patterns or speckles over the leaves and stems; and those with, grass-like leaves. Because of their excellent garden potential, breeders have been hard at work and have produced some stunning garden hybrids. Lachenalias make ideal subjects for pots, borders or pathways. Being winter flowering they make good bulbs for planting underneath deciduous trees, as long as the fallen leaves are cleared off the new growth in autumn. They are also excellent planted with succulents in the garden, and in rockeries, or in pockets in a retaining wall.
 Lachenalia hybrid 'Rosabeth' Picture courtesy www.newplant.co.zaLachenalias are easy to grow in the garden or in pots, as long as you meet their growth requirements. Naturally, they are ideally suited to Mediterranean climates with winter rainfall, but they can be grown in inland gardens if they are protected from frost. In very cold regions it is best to plant them in pots, placed in a sunny, protected spot in the garden or on the patio. They thrive in full sun, but will take light shade. Bulbs become available from the end of February and need to be planted before the end of April. Plant them +- 1.5cm deep and +-2.5cm apart. Remember that they prefer a light yet fertile, well-drained soil; and this is extremely important in the summer rainfall regions. During their growing season in winter, they require regular watering, so in the summer rainfall regions you will need to water them together with your other winter and spring flowering annuals and bulbs. Not much fertilising is required for these bulbs as they are not generally very hungry, but you can fertilise your plants occasionally. Because the plants go totally dormant in summer; in the summer rainfall regions it is best to plant them into containers which can easily be moved out of the rain. In Mediterranean climates the bulbs can be left in the beds as long as they do not receive summer watering. The plants tolerate a considerable amount of crowding and do not need to be divided every year, but eventually you should separate them.
Most gardeners plant Lachenalias into pots where their unusual blooms and striking foliage can be appreciated to the full. They look at their best in broad, shallow containers, and should be planted even closer together than in the garden, in light, airy and friable soil. Potted plants will need occasional fertilisation during the growing season, but over fertilisation will result in growth which is too lush. Because soil in pots dries out quickly, regular watering during the growing season is also crucial. As soon as flowering is finished container plants may be left to dry out for their seasonal dormant period.
 Lachenalia matthewsii. Picture courtesy www.telosrarebulbs.comFull Version:
Description, History & Interesting Facts:
Lachenalia are fabulous little blooms which will definitely draw comment in your garden with their fascinating leaves and bright little bell-shaped flowers on upright stems, and most unusual colourings. The genus Lachenalia is endemic to southern Africa, occurring in Namibia, the Free State and the Northern, Western and Eastern Cape provinces, but the vast majority of species are found in the winter-rainfall regions of the Cape. With about 110 species, it is the largest genus in the Hyacinth family (Hyacinthaceae). Their relationship to Hyacinths is obvious, since they are quite fleshy in appearance, produce thick, succulent flower stems in a spike-like arrangement, and are often scented with distinctive aromas ranging from spicy, to sweet. They may be short in stature, with their flowers growing on spikes about 25cm high, but what they lack in stature, they more than make up for with their vividly coloured blooms, which include green, glowing shades of red, yellow, chartreuse and purple. Being a winter growing plant, Laschenalias enjoy plenty of water at this time of the year, but at the same time, good drainage. Some Lachenalia species actually grow in seasonal swamps, being in water when in flower; but in cultivation, under wet conditions they are likely to be exposed to root diseases not found in their natural habitat, so good drainage is a good rule of thumb. These winter and spring flowering bulbs are dormant in summer, only growing and flowering in winter and spring, from about July to October, depending on the species. As flowering times vary between specific plants, if you choose your varieties cleverly, you could have a succession of flowers. The blooms last well in the garden and can even be picked for indoor display. Their diversity in foliage includes those with broad green leaves, with purple patterns or speckles over the leaves and stems, which can be hairy or smooth; and those with, grass-like leaves. Because of their excellent garden potential, breeders have been hard at work and have produced some stunning garden hybrids.
 Lachenalia aloides. Picture courtesy www.newplant.co.zaLachenalia aloides is one of the most popular garden species with its stunning flowers and interesting maroon speckled leaves. It is quite a variable species, but its pendant, tubular flowers are commonly a bright yellow, accented with red and green, but can vary in colour from yellow, to orange and red. It flowers in late winter to early summer and grows +-20 to 25cm tall. Numerous cultivars have been bred for garden use.
Lachenalia aloides var. quadricolor is found in humus-rich crevices in granite outcrops in the Western Cape. It is easily identified by its distinctive four coloured flowers, which start a reddish orange at the base, shading to yellow and bright green, with purplish-maroon tips. This is an early flowering species blooming in winter, and one of the most colourful and vigorous of the Lachenalias.
Lachenalia aloides var. vanzyliae is truly beautiful with its tubular flowers in pearly shades of blue, white and pale green, which will have all your guests commenting on its unusual colour combination. Flowering is in spring and early summer. The plant produces one or two variable leaves, sometimes unmarked, but often marked purplish-brown on the upper surface.
 Lachenalia bulbifera. http://www.telosrarebulbs.comLachenalia bulbifera (syn L. pendula) is endemic to the western and southern coastal parts of the Western Cape, where it usually grows in large colonies on deep, acid or alkaline sand dunes and flats, as well as on granite outcrops in gravelly clay and humus-rich soils. It grows in full sun or light shade and is often encountered flowering on sea-facing dunes just above the high water mark. The flowers vary in colour and flowering time, depending on wild locality; forms occurring in the southern Cape tend to flower from mid to late autumn (April to May) and have relatively short, pale or dark orange flowers, whereas those from the West Coast and the Cape Flats flower in midwinter (June to August) and have longer flowers in various shades of red and orange. This plant grows +-30cm tall and has plain green, or heavily spotted purple leaves. It is easy to cultivate in the garden or containers, and is one of the earliest species to flower. If planted together with other Lachenalias it will extend the flowering season. Flowering time can also be delayed by planting out the bulbs later. In pot culture the flowering season can be extended by planting some of the bulbs, and when these are 3 or 4cm tall, planting out the rest of the bulbs.
 Lachenalia hybrid Namaqua. Picture courtesy www.newplant.co.zaLachenalia mathewsii is an endangered plant which was considered extinct from 1943 until 1983, when it was rediscovered. Unfortunately, most of its natural habitat has been converted to agricultural use and, as a result, it grows naturally in only one area on the west coast. Luckily, Kirstenbosch National Botanic Garden in Cape Town, has worked to make plants and seeds available so that today this Lachenalia is grown worldwide for its lovely bright yellow flowers with conspicuous green markings near the tips of each petal, and its unmarked fresh green leaves. The blooms have a mild spicy scent. It grows +-10 to 20cm tall.
Lachenalia viridiflora is a strikingly beautiful species which has a limited distribution in the Vredenburg district, where it is restricted to shallow humus-rich depressions on granite outcrops. It is usually a dwarf species in nature; growing +-8 to 20cm tall and blooming early in the season. The pale green leaves may be plain or darkly spotted; and the flowers vary in colour from viridian green to blue-green or turquoise; a very rare colour in the plant world.
 Lachenalia orthopetala. Picture courtesy www.telosrarebulbs.comLachenalia orthopetala is one of the rarest and most rewarding bulbs to grow in the garden; typically growing in lowland renosterveld areas, on seasonally damp clay flats which dry out during the summer months. In winter the soil becomes partially inundated or very damp. This species is closely related to Lachenalia contaminata which occupies the same habitat and has a very similar appearance. The flowers of L. orthopetala are creamy white with maroon markings at the tips, while the flowers of L. contaminata are much denser on the spike and also a lot shorter and flaring. Although Lachenalia orthopetala is, according to the latest Red List, rated as vulnerable; it is currently fairly widespread in the south-western Cape from Piketberg to Durbanville. However, its preferred habitat is under severe threat from ever-increasing farming practices and urbanization. Although it is only found growing in scattered pockets, these pockets contain dense stands of sometimes many thousands of plants. The leaves will start to emerge a few weeks after the first rains in autumn but the flowers only appears much later, towards the end of the growing season, in late spring or early summer (September to October), usually as the leaves begin to die back.
 Lachenalia aloides var. vanzyliae. Picture courtesy www.telosrarebulbs.comLachenalia Hybrids are compact bulbs with sturdy, compact spikes of long-lasting trumpet blooms. These colourful container plants grow +-10 to 20cm tall in sun or semi-shade. New named hybrids come in a wide colour range; some are even bicoloured, varying from orange and red to lavender and blue. Try ‘Namakwa’ with its yellow flowers with red tips; ‘Robijn ‘ with red flowers and yellow tips; ‘Romaud’ with its light yellow flowers with shades of green; ‘Ronina’ for its bright yellow flowers; ‘Rosabeth’ with its lovely bright red flowers with green tips; or ‘Rupert’ with its wonderful purple flowers with green tips.
In the Garden:
The striking foliage and vividly coloured blooms of Lachenalias make them ideal subjects for pots, borders or pathways. Being winter flowering they make good bulbs for planting underneath deciduous trees, as long as the fallen leaves are cleared off the new growth in autumn. Try combining them with Grape Hyacinths (Muscari); or with early daffodils or spring star flowers (Ipheion). They are also excellent planted with succulents in the garden, and in rockeries, or in pockets in a retaining wall. When in full bloom, potted plants can be moved inside for a day or two at a time where their gorgeous beauty can be fully appreciated.
The long, tubular flowers of Lachenalia are specialized for pollination by sunbirds, especially lesser double-collared sunbirds (Nectarinia chalybea) that feed on nectar contained in the base of the perianth tubes. This is especially true of L. bulbifera, because their stems are easily able to support the weight of visiting birds that cling to the stems while probing the flowers for nectar.
 Lachenalia aloides var. quadricolor. Picture courtesy www.telosrarebulbs.com Cultivation:
Lachenalias are easy to grow in the garden or in pots, as long as you meet their growth requirements. Naturally, they are ideally suited to Mediterranean climates with winter rainfall, but they can be grown in inland gardens if they are protected from frost. In cultivation, they appear to tolerate some frost and brief exposure to low temperatures; but in very cold regions it is best to plant them in pots, placed in a sunny, protected spot in the garden or on the patio. They thrive in full sun, but will take light shade.
Lachenalia bulbs become available from the end of February and need to be planted before the end of April. Plant them +- 1.5cm deep and +-2.5cm apart. Remember that they prefer a light yet fertile, well-drained soil; and this is extremely important in the summer rainfall regions. In loamy or clay soils, work river sand into the beds, without adding compost. During their growing season in winter, they require regular watering, so in the summer rainfall regions you will need to water them together with your other winter and spring flowering annuals and bulbs. Not much fertilising is required for these bulbs as they are not generally very hungry, but you can fertilise your plants occasionally. Average soils are usually adequate for growth, and a yearly addition of compost should be sufficient to encourage strong growth and good flowering.
Because the plants go totally dormant in summer; in the summer rainfall regions it is best to plant them into containers which can easily be moved out of the rain. In these regions, if you are growing them in garden beds, you will have to stop watering the bulbs in late spring or early summer when they are finished blooming, allowing the leaves to die down naturally and then lifting and storing them in paper bags or boxes for next season. In Mediterranean climates the bulbs can be left in the beds as long as they do not receive summer watering. The plants tolerate a considerable amount of crowding and do not need to be divided every year, but eventually you should separate them. At re-planting or re-potting time the bulbs should be graded so that the small ones can be grown on elsewhere, while only the medium and large bulbs are planted back into garden beds or pots.
Most gardeners plant Lachenalias into pots where their unusual blooms and striking foliage can be appreciated to the full. They look at their best in broad, shallow containers, and should be planted even closer together than in the garden, in light, airy and friable soil. Potted plants will need occasional fertilisation during the growing season, but over fertilisation will result in growth which is too lush. Because soil in pots dries out quickly, regular watering during the growing season is also crucial. As soon as flowering is finished container plants may be left to dry out for their seasonal dormant period.
 Lachenalia viridiflora. Picture courtesy www.telosrarebulbs.comPropagation:
Lachenalias can be grown from seed, and the plants will produce seeds if there are 2 different clones of the same species to cross pollinate, flowering in their third season from seed. Hybrids are rare. Lachenalias also produce ‘bulblets’ freely around the base of the original bulb, and when lifted, can be split apart for propagation. With L. bulbifera, these offsets will usually flower the following season after they are formed.
Pests & Diseases:
Lachenalias generally suffer from few pests and diseases if they are grown correctly, but watch out for slugs. The bulbs of Lachenalia bulbifera are highly susceptible to infestation by mealy bugs, and if not treated timeously, can eventually result in disintegration of the bulb. Mealy bugs are also transmitters of viral disease and are often spread from one plant to another by ants. An unsightly rust fungus (Uromyces lachenaliae) sometimes attacks the leaves if the plants do not have sufficiently well-aerated conditions; this can be treated with any fungicide recommended for rust. Fungal diseases of the bulbs are usually the result of a poorly drained growing medium and failure in maintaining a dry summer rest period. Excessive heat or low light levels will result in limp and lanky plants that may not flower well; these conditions can also encourage rot.
Where porcupines and mole rats occur, outdoor plantings are liable to be dug up and eaten; and if moles are prevalent, particularly the Cape golden mole (runner mole), it is advisable to line the area with wire-mesh or sink a wire basket into the soil as the bulbs can be lifted by the tunnelling activities of the moles.
Grape Hyacinth - Muscari
 Muscari. Picture courtesy Hadeco These tiny flowering bulbs originate in the Mediterranean and south-western Asia Minor. They are grown for their dense spikes of fragrant, deep blue flowers. Plant them in large drifts in the woodland garden or as a border to the flower garden. Their deep blue flowers are perfect for creating spectacular contrasts with other flowers such as daffodils or tulips. Plant them close together in small pots and bring them indoors when they are in bloom and allow their sweet fragrance to fill the room.
They are very hardy to frost and grow best in semi-shade to +-15cm tall. Plant them in good, well-drained soil, 5cm deep and 5cm apart, closer if you are planting in pots. Water them regularly and feed them with Hadeco Bulb Food. You can leave them in the ground for up to three years before lifting and dividing them in early summer.
Dutch Iris
 Dutch Iris Mixed - Picture courtesy Hadeco
Condensed Version:
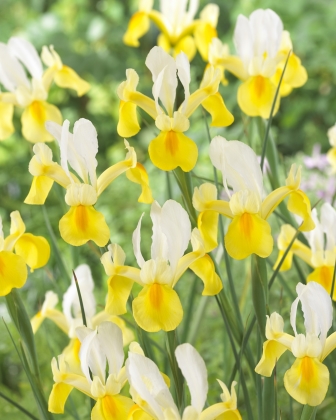
Dutch Irises are renowned for their distinctive flowers and satiny petals in shades of blue, violet, yellow, rose, gold, and white, and often have streaks of yellow or gold on the falls. They will grow between 40 to 90cm tall and spread 15 to 20cm wide, growing in winter to flower in early spring, before going dormant again during summer. Wait until autumn, planting anytime from mid-April to mid-June.
Dutch irises grow best in cool to cold climates and will tolerate moderate frost and temperatures as low as 0°C. They will also grow in subtropical regions, where they are treated as annuals. In warm winter climates like South Africa the bulbs will start producing foliage in late autumn or early winter but will only flower in spring. In severely cold regions, you will not see any foliage growth until spring.
Although Irises require sunlight to flower, in our hot climate avoid positions with full sun, rather select a semi-shaded position in the garden, or a position which receives morning sun and afternoon shade. The bulbs like a fertile, well-drained soil which has sufficient compost worked into it. Never put anything, including fertiliser into the panting beds, or in the bottom of the planting holes, as direct contact with fertiliser can burn the bulbs, rather apply a light dressing with a granular organic fertiliser over the surface of the bed once you have finished planting, and water well afterwards. Many gardeners prefer to start feeding with a liquid fertiliser only once the bulbs start growing.
Potted Dutch Irises need pots at least 20cm deep with drainage holes, and a good quality potting soil with excellent drainage will suffice. Remember that potted plants require more frequent watering than those growing in garden beds, as well as regular feeding with a liquid fertiliser throughout the growing season. Plant the bulbs about 5 to 10cm deep, and space them about 7cm apart, with the pointed end facing up. If you are planting in pots, plant them closer together and place the pot in a cool, semi-shaded spot.
Water the pots or beds thoroughly after planting, soaking the soil to settle it around the bulbs, but try not to water again until the foliage emerges, however, if watering can’t be avoided at this stage it is not a problem, as long as the soil has perfect drainage. When the bulbs are actively growing and flowering, water deeply about once a week.
Because we generally have a short and hot spring season, the bulbs don’t perform as well if they are lifted and stored for next season. For this reason they are usually treated as annuals and bulbs are purchased fresh each season.
 Dutch Iris 'Dark Blue' - Picture courtesy HadecoFull Version:
Description, History & Interesting Facts:
There’s no denying it, the blooms of Dutch irises are simply irresistible, and remain a favourite of florists and gardeners, and it’s no wonder they captured the imagination of artists like Vincent van Gogh, who painted several pictures of them. Once you see a drift of Irises in full bloom, you’ll understand why it’s worth the effort to work a few into your landscape.
Iris is a genus of about 300 species of plants in the family Iridaceae, which includes some of the most popular and varied garden flowers. The diversity of the genus is centred in the northern temperate zones, occurring in a wide variety of terrains, and some of its most handsome species are native to the Mediterranean and central Asian areas.
Botanically, Dutch Irises are known as Iris hollandica or Iris x hollandica, and this group of Iris are actually hybrids of several different Irises. Some folks call Dutch Iris “Florist Iris,” because this is the type traditionally found in flower shops.
The story of the hybridization of the Dutch Iris is a long one, which began in 1564 when a specific Iris caught the eye of the Flemish doctor and pioneering botanist, Carolus Clusius, who was perhaps the most influential of all 16th-century scientific horticulturists. He was travelling through Spain when he saw the beautiful violet coloured Iris xiphium and was so enthralled by its beauty he sent bulbs back to Belgium, introducing what is now known as the “Spanish Iris” to the country.
Click here to see google images of Iris xiphium
It was not until the end of the 19th century that the Spanish Iris was introduced to the Netherlands and Dutch growers eventually crossed it with Iris tingitana from north-western Africa. The resulting plant was a great success with larger and broader petals than its two parent plants, and became known as the “Dutch Iris”.
Click here to see google images of Iris tingitana
The name “Iris” was given to these plants for the variety of flower colours displayed, and the root of the word ‘iris’ stems from a Greek word for rainbow, and in Greek mythology Iris was the goddess of the rainbow. So it was the rainbow shades of Iris flowers that inspired the name, which is most apt for modern Dutch Irises, as they are renowned for their distinctive flowers and satiny petals in shades of blue, violet, yellow, rose, gold, and white, displaying six exquisite petals - three central, upright ‘standards’, and three larger outer ‘falls’ that recurve outward, and often have streaks of yellow or gold on the falls.
The most popular colour is probably the blue iris, as blue is a rare flower colour in nature, followed by the purple ones. You can also find Dutch Irises in other hues, including rose, burgundy, bronze, burnt orange and other tone variations, but these are not freely available in South Africa.
Uses:
Dutch Irises are sought after cut flowers which can be found in florists almost all year round because professional flower growers use temperature manipulation to trick the bulbs into flowering out of season – a technique also used on lilies and tulips.
 Dutch Iris 'Symphony' - Picture courtesy Hadeco
In the Garden:
Bring out the artist in you and plant some Dutch Irises this autumn. Today they are used in new and innovative ways, and the deep green, grass-like foliage compliments modern garden designs, where they combine beautifully with ornamental grasses and other low maintenance garden plants; and for a picture perfect display, combine them with other spring flowering bulbs and annuals.
The flowering stems can reach up to 80 or 90cm tall, allowing Irises to show off their blooms amongst other shorter flowers, and one of the reasons Dutch Irises are great in containers – on their own or mixed with other plants to create a living bouquet.
Dutch Irises are excellent cut flowers, lasting very long in a vase, and the beauty of these flowers is that they’ll continue to open up once cut, making for a lovely lengthy display of colour. Cut the flowering stems when the flower buds are peeking about halfway out of the green sheath - the bloom should be unfurled slightly at the tip. Cut the stems close to the ground, but take care not to cut into leaves. To prolong the cut flowers life even further, replace the water in the vase every second day.
Cultivation/Propagation:
Dutch Irises will grow between 40 to 90cm tall and spread 15 to 20cm wide, growing in winter to flower in early spring, before going dormant again during summer. They grow best in cool to cold climates and will tolerate moderate frost and temperatures as low as 0°C. Dutch irises will also grow in subtropical regions, and are known to tolerate the heat and humidity in Florida and Texas, where they are treated as annuals. In warm winter climates like South Africa the bulbs will start producing foliage in late autumn or early winter but will only flower in spring. In severely cold regions, you will not see any foliage growth until spring.
Wait until autumn when the soil temperature has dropped, before planting, usually anytime from mid-April to mid-June. Because Dutch Irises love a cooler climate and go dormant when the weather warms up, you can easily manipulate the plant to make it flower early in September by placing the bulbs in the fridge for six weeks before planting them. The advantage of doing this is, because they start flowering earlier, they will also flower for longer.
Although Irises require sunlight to flower, and in overseas catalogues they are mostly sold for full sun, in our hot climate avoid positions with full sun, and rather select a semi-shaded position in the garden, or a position which receives morning sun and afternoon shade. Never plant anywhere close to hot paving, or close to a hot north-facing wall. The overhanging branches of shrubs and deciduous trees will also help to protect the plants from too much sun.
Iris bulbs like a fertile, well-drained soil which has sufficient compost worked into it, and once the bulbs are planted, mulch or extra compost laid over the surface of the soil will go a long way in keeping the soil cool and moist. Never put anything, including fertiliser into the panting beds, or in the bottom of the planting holes, as direct contact with fertiliser can burn the bulbs, rather apply a light dressing with a granular organic fertiliser over the surface of the bed once you have finished planting, and water well afterwards. Many gardeners prefer to start feeding with a liquid fertiliser only once the bulbs start growing.
Potted Dutch Irises need pots at least 20cm deep with drainage holes, and a good quality potting soil with excellent drainage will suffice. Remember that potted plants require more frequent watering than those growing in garden beds, as well as regular feeding with a liquid fertiliser throughout the growing season.
Usually the rule of thumb when planting bulbs is that they need at least 2 times their height of soil above them, but generally the planting instructions suggest you plant them about 5 to 10cm deep, and space them about 7cm apart, with the pointed end facing up. Remember to mark where you have planted the bulbs to avoid digging them up accidentally. If you are planting in pots, plant them closer together and place the pot in a cool, semi-shaded spot.
Water the pots or beds thoroughly after planting, soaking the soil to settle it around the bulbs, but try not to water again until the foliage emerges, however, if watering can’t be avoided at this stage it is not a problem, as long as the soil has perfect drainage. When the bulbs are actively growing and flowering, water deeply about once a week, but once flowering is over and the leaves start to die down, stop watering.
 Dutch Iris 'White' - Picture courtesy HadecoIn colder climates, the bulbs can be left in the soil to naturalise, or they can be lifted and stored when the foliage has died down in summer. In South Africa this would be around November, but unfortunately, because we generally have a short and hot spring season, the bulbs don’t perform as well if they are lifted and stored for next season. For this reason they are usually treated as annuals and bulbs are purchased fresh each season. If you live in a cooler region and wish to try storing the bulbs, lift and store them at room temperature until early autumn and then transfer them to the refrigerator until planting time. If your soil drains well, you can just leave the bulbs in the soil and hopefully they will flower again next year.
Problems, Pests & Diseases:
If Dutch irises are grown correctly they will suffer from no serious pests or diseases, but as the weather warms up in spring, watch out for aphids and thrips and spay accordingly. Snails and slugs also become active at this time and may need to be controlled. Simply applying a layer of sharp grit on the soil around the plants will help to discourage this garden pest.
Warning:
Take care and use gloves when planting Iris bulbs as they can cause skin irritation.
Irises should not be eaten and are poisonous for dogs and cats.
Chasmanthe, Suurkanol - Chasmanthe species

 Chasmanthe aethiopica Picture courtesy www.newplant.co.zaChasmanthe is a genus of plants which belongs to the Iris family. There are only three species, Chasmanthe aethiopica, Chasmanthe bicolor and Chasmanthe floribunda; all of which occur only in the Cape flora. They are tough, resilient and trouble-free plants with long attractive sword-shaped leaves, and gorgeous spikes of narrow, curved, bright orange or yellow flowers on arching stems.Blooming occurs in autumn, winter or spring, depending on the species, and the blooms are good cut flowers. The flowers produce copious amounts of nectar which will attract sunbirds to your garden, and especially the Lesser Double-collared Sunbird which frequents coastal scrub. The large swollen fruits burst open at maturity to expose the small bright orange seeds which are dispersed by fruit-eating birds, and are a favourite of Red-winged Starlings.
 Chasmanthe floribunda var. floribunda 'Red flames' Picture courtesy www.newplant.co.zaAll three Chasmanthe species are bulbous winter-growing plants which will go dormant in the summer. The species vary in height from +-60cm to 1.2m tall and are often inter-planted with Agapanthus because they complement each other very well, with the Agapanthus flowering in summer and the Chasmanthes in winter. Evergreen or deciduous agapanthus can be used to fill the gap when the Chasmanthes is dormant.
Chasmanthes do best in milder climates and thrive in the winter rainfall regions, but they will adapt to most regions of the country, except for those regions which experience severe frost or high humidity. They thrive in deep fertile soil that has been well-composted and which drains well. In the summer rainfall regions they will take summer irrigation as long as the soil drains well, but will need regular watering during autumn, winter and spring. A good mulch of compost and a dressing of organic 3:1:5 in autumn will boost their performance. Chasmanthes are not susceptible to any serious pests or diseases.
 Chasmanthe floribunda var. duckittii Picture courtesy www.newplant.co.zaChasmanthes multiply freely and can form dense colonies of plants which flower best when left undisturbed in the garden for several years. They can be planted into containers, but will need dividing more often. Corms that have been lifted and replanted will take at least a season to re-establish themselves and will often not flower the season after replanting. The corms can be planted about 3 to 5cm deep in full sun or semi-shade.
Dense colonies of plants can be lifted and divided when they are dormant and re-planted in early autumn. Seed can be sown from March to May in trays or pots at least 10cm deep, to give the roots sufficient room to develop. Place the pots in a semi-shaded position and ensure that the growing medium drains well and is kept moist but not soggy. Plants grown from seed should be kept in their pots or trays for one season before being planted out into the garden. They will start to bloom in their second season.
(Chasmanthe aethiopica) This beautiful species is one of earliest of the Cape bulbs to flower, producing brilliant deep orange-red flowers in autumn and winter (April to July). It grows in coastal bush and along forest margins and is common along the southwestern and southern coastlines, growing in the wild from just north of Cape Town, through the Peninsula and all along the coastline to Port Elizabeth and Kentani in the Eastern Cape. It is slightly smaller growing than the other species +-60cm.
(Chasmanthe floribunda var. floribunda) Red Flames. This is a widespread variety and can be found growing in coastal and montane flora, on sandstone and granite soils of the northwestern and southwestern Cape; from the Bokkeveld mountains to Hermanus. It is a tall handsome variety +-60 to 120cm with spikes of flame coloured flowers in winter.
(Chasmanthe floribunda var. duckittii) This is a scarce but beautiful form which occurs in the wild in only a few locations near Darling in the Northern Cape, but does particularly well at Kirstenbosch. It is easy-to-grow in the garden and bears beautiful primrose yellow blooms in late winter, early spring and summer. This coastal and montane plant favours growing in damp spots, on rocky sandstone and granite outcrops, in full sun.
(Chasmanthe bicolor) Grows in the south-western Cape where it is extremely rare and almost extinct in the wild, but it is very undemanding and easy-to-grow in the garden. It is a tall growing species +-70 to 90cm and makes a highly ornamental garden subject with its striking vermillion and yellowish-green flowers in late winter to early spring.
Baboon Flower, Bobbejaantjie - Babiana
 Babiana 'Lonely Hills' Picture courtesy www.newplant.co.za
The genus Babiana belongs to the family Iridaceae and is endemic to southern Africa; meaning that they grow wild nowhere else in the world. There are approximately eighty species, most of which occur in the south-western and western parts of the Western Cape, and in Namaqualand. Babiana pygmaea has a highly restricted distribution and is only known from a few sites in the Darling and Malmesbury Districts. Its conservation status is currently listed as 'Vulnerable' because much of its natural habitat is now used for the cultivation of winter cereal crops. The common name baboon flower was given because baboons relish the corms. The babianas we grow in our gardens are of hybrid origin, mainly between the numerous forms of Babiana stricta.
 Babiana stricta. Picture courtesy www.newplant.co.zaBaboon flowers have endeared themselves to gardeners around the world because of their remarkable variety in flower shape, their brightly coloured and deliciously spicy, sweetly scented flowers, as well as their attractive pleated leaves. They are almost all winter-growing and generally flower in late winter and spring. The cup shaped blooms are arranged along a 20cm tall floral spike, and the blooms open successively from the lowest upwards. They come in a range of colours, from blue to mauve and purple; red to pink; and yellow, pure white and cream. Plant them in groups, into deep window boxes and pots, or sunny rock garden pockets, where they will reward you with their late winter and spring colour. If grown in garden beds it is advisable to plant them in pockets lined with wire mesh in order to dissuade mole rats from eating them. When in bloom, feel free to cut the flowers for brilliant bouquets, as this will not hurt the plants.
 Babiana "Way Out" 'Lonely Hills Hybrid' Picture courtesy www.newplant.co.zaBaboon flowers thrive in temperate winter rainfall climates, actively growing only during the wet season and going totally dormant throughout the hot, dry summer months. They can withstand light frost and flower best in full sun. Corms are planted out from mid-April to late May and require very well-drained soil; doing best in sandy loam. The corms like to be deep-seated and should be planted with at least 8cm of soil over them. Spacing is generally about 5cm apart, but if you are planting into containers they should be planted closer. Don't worry about which side of the corm is facing up as they will be fine however they are positioned. In containers they do best in a well-drained medium of river sand, good potting soil and a little compost. In the summer rainfall regions they will require regular deep watering to root level throughout winter and spring, but the corms should be kept on the dry side in summer. If they are cultivated in containers they can simply be moved to a cool dry location for the summer months. After
  Babiana Purple Tips 'Lonely Hills Hybrid' Picture courtesy www.newplant.co.zablooming has finished for the season leave the foliage in place; don't cut it off until the leaves are totally brown, as the leaves will gather sunlight, creating food through photosynthesis to strengthen the bulbs for the future. Corms may be left in the soil undisturbed for several years, but can be lifted in early summer and stored in a dry packing material until the following autumn.
Division is by offsets which form on runners underground as well as on mature corms. Babianas can also be multiplied by seed sown in autumn, and germination should take about six weeks. In order to obtain pure seeds from container grown plants, containers should be isolated and the flowers pollinated by hand. Sow thinly into deep pots or raised beds to prevent overcrowding and damping-off, and kept the soil moist but not soggy until  Babiana bicolor 'Lonely Hills Hybrid' Picture courtesy www.newplant.co.zagermination. Seedlings should remain undisturbed for two years before being potted up into permanent containers or into the garden, at the beginning of their third season. Under ideal conditions flowering may commence during the second season, but are usually expected during the third year.
The corms are subject to infestation by mealy bugs, as well as to fungal rotting when cultivated in insufficiently well-drained growing media. Watch out for red spider mites underneath the leaves during dry spells.
Barley - Hordeum vulgare
 Barley. Reproduced by kind permission of and copyright Laura DrydenBarley is a member of the grass family Poaceae. This annual cereal grain serves as a major animal feed crop, with smaller amounts used for malting and in health food. Barley was one of the first crops domesticated in the Near East and was a staple cereal of ancient Egypt, where it was used to make bread and beer.
What are the health benefits of Barley?
Barley that is home grown and eaten green has vital health boosting effects on the body and is given to convalescing patients. It is rich in protein, B vitamins and minerals.
Can I give Barley to my pet?
If you have barley grass growing at home your cats and dogs will naturally find it and chew on it, otherwise you could make it into an herbal tea to add to their meals or drinking bowls.
Click here to read my article on herbs that are great for dogs and cats
How to make medicinal barley tea
Drink daily for high cholesterol, kidney and bladder ailments, osteoporosis, fevers, flu, bronchitis, stomach disorders, hepatitis, cramps, diabetes, arthritis, gout and even hay fever.
Place a quarter cup of chopped leaves in a tea cup and fill with boiling water. Allow to steep for 5 minutes before straining and drinking.
Alternatively boil 1 cup of pearl barley in 2 liters of water for 1 hour, topping up with more water if necessary. Strain the water and store it in the refrigerator. Drink a glass a day, adding some lemon juice if desired. Always consult your physician before starting a home treatment programme; especially for serious ailments.
How to grow Barley?
If barley is grown as a grain crop it is sown as an intermediate to cool season crop. However, it is not very frost hardy but needs to be harvested before it gets too hot in summer. It is widely adaptable and is currently a major summer crop of the temperate regions of the world. In tropical areas it is sown as a winter crop.
Sow the seeds into deeply dug beds with lots of added compost, in full sun. Its germination time is anywhere from 1 to 3 days
How to grow Barley sprouts and microgreens at home?
For health purposes, barley can easily be sprouted at home to add to healthy salads and stews, and as a microgreen barley grass is most often juiced for its health benefits.